


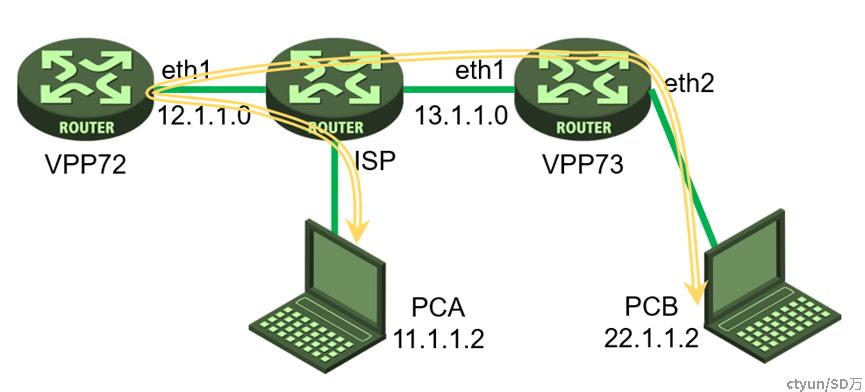
在openVPP的组网中,分支设备VPP73使用普通网络,不具有公网IP地址,同时向总部设备建立穿越NAT设备的IPsec VPN隧道;同时有居家办公的员工使用openVPN接入公司网络,需要和分支的设备进行互通。
然后就有小伙伴讲了,openVPN已经过时了,现在流行用Wireguard。那好吧,我试试能不能把VPP和Wireguard组合起来用一下,姑且先叫他WireVPP吧。
WireVPP还是使用上面的组网图,组网的变更部分是PCA不再使用openVPN接入,而是换为Wireguard接入。
这里面涉及的接口配置、IPsec配置、Wireguard配置和NAT配置,我们前面都已经做过详细介绍,现在只要进行整合,即可实现网络互通。各部分配置如下:
VPP接口配置
我们计划使用VPP72的公网接口ETH1来接入Wireguard用户,需要配置VPP和内核的互通,首先给eth1配置IP地址。
vppctl set int state eth1 up
vppctl set int ip address eth1 12.1.1.2/24
在内核创建一个veth接口,一端命名为ethvpp,另一端命名为ethhost。
ip link add name ethvpp type veth peer name ethhost然后使能veth两端的接口ethhost@ethvpp和ethvpp@ethhost。
ip link set dev ethvpp up
ip link set dev ethhost up
接口UP起来之后,我们给内核中的ethhost接口分配一个IP地址。
ip addr add 172.16.1.1/24 dev ethhost在VPP内也创建一个接口,来连接到ethvpp的主机接口。
vppctl create host-interface name ethvpp然后手工使能接口host-ethvpp,并配置IP地址。
vppctl set interface state host-ethvpp up
vppctl set int ip address host-ethvpp 172.16.1.2/24
然后从内核中测试一下172.16.1.2的连通性。
Wireguard服务器端配置
首先使用3条命令完成标准内核下的Wireguard安装,即使用ELRepo的预构建模块进行安装。
yum install -y epel-release elrepo-release
yum install -y yum-plugin-elrepo
yum install -y kmod-wireguard wireguard-tools
为PCA和VPP72安装好Wireguard之后,使用程序自动生成WireGuard需要使用的base64编码的公钥和私钥:
umask 777
wg genkey > privatekey
wg pubkey < privatekey > publickey
记录下PCA和VPP72的公钥和私钥信息,生成配置文件。VPP72的配置文件如下:
[Interface]
PrivateKey = QKN+GiDImPmxfxhFu1Ca1mV9/bu8URieGKYwelbAj0s=
Address = 10.1.1.1/24
ListenPort = 10086
[Peer]
PublicKey = reMkRBC1wrBqPOrqDRYVNGx4RBLwM2iYCKYzvC7lbCg=
AllowedIPs = 10.1.1.0/24
然后使能Wireguard接口配置。
wg-quick up /root/wg0.confNAT配置
后面建立Wireguard隧道时,我们要使用内核中的ethhost来响应客户端的Wireguard连接请求,接下来要在VPP中配置映射,将访问12.1.1.2的UDP端口10086的流量映射到172.16.1.1上。
vppctl set interface nat44 out eth1 output-feature
vppctl nat44 add interface address eth1
vppctl nat44 add identity mapping 12.1.1.2
vppctl nat44 add static mapping udp local 172.16.1.1 10086 external 12.1.1.2 10086
连接Wireguard客户端
我们为PCA创建一个配置文件,把相关的路由都添加进去。
[Interface]
PrivateKey = 2DOnuYIGbLMplHdd3TjwUjbZGQfPC6kxbp+XE+Z1FlM=
Address = 10.1.1.2/24
ListenPort = 10086
[Peer]
PublicKey = s7yGM3skqcKosTpHkjz05xHv4gOkRlbwEvA3qAJ1dWE=
Endpoint = 12.1.1.2:10086
AllowedIPs = 10.1.1.0/24,172.16.1.0/24,130.1.1.0/24,22.1.1.0/24
PersistentKeepalive = 10
然后使能Wireguard接口配置。
wg-quick up /root/wg0.conf测试PCA到VPP72的访问。
IPsec VPN配置
直接贴配置。
VPP72
vppctl ikev2 profile add wireguard
vppctl ikev2 profile set wireguard auth shared-key-mic string wireguard
vppctl ikev2 profile set wireguard id local ip4-addr 12.1.1.2
vppctl ikev2 profile set wireguard id remote fqdn vpp73
vppctl ikev2 profile set wireguard traffic-selector local ip-range 0.0.0.0 - 255.255.255.255 port-range 0 - 65535 protocol 0
vppctl ikev2 profile set wireguard traffic-selector remote ip-range 0.0.0.0 - 255.255.255.255 port-range 0 - 65535 protocol 0
vppctl set interface state ipip0 up
vppctl set interface ip address ipip0 130.1.1.1/24
然后分别添加去往PCA和PCB的明细路由。
vppctl ip route add 22.1.1.0/24 via 130.1.1.3 ipip0
vppctl ip route add 10.1.1.0/24 via 172.16.1.1
VPP73
vppctl set int state eth1 up
vppctl set int ip address eth1 13.1.1.3/24
vppctl set int state eth2 up
vppctl set int ip address eth2 22.1.1.1/24
vppctl ip route add 12.1.1.0/24 via 13.1.1.1
vppctl ikev2 profile add wireguard
vppctl ikev2 profile set wireguard auth shared-key-mic string wireguard
vppctl ikev2 profile set wireguard id local fqdn vpp73
vppctl ikev2 profile set wireguard id remote ip4-addr 12.1.1.2
vppctl ikev2 profile set wireguard traffic-selector local ip-range 0.0.0.0 - 255.255.255.255 port-range 0 - 65535 protocol 0
vppctl ikev2 profile set wireguard traffic-selector remote ip-range 0.0.0.0 - 255.255.255.255 port-range 0 - 65535 protocol 0
vppctl ikev2 profile set wireguard responder eth1 12.1.1.2
vppctl ikev2 profile set wireguard ike-crypto-alg aes-cbc 256 ike-integ-alg sha1-96 ike-dh modp-2048
vppctl ikev2 profile set wireguard esp-crypto-alg aes-cbc 256 esp-integ-alg sha1-96 esp-dh ecp-256
vppctl ikev2 profile set wireguard sa-lifetime 3600 10 5 0
vppctl ikev2 initiate sa-init wireguard
vppctl set interface state ipip0 up
vppctl set interface ip address ipip0 130.1.1.3/24
然后添加去往VPP72和PCA的明细路由。
vppctl ip route add 172.16.1.0/24 via 130.1.1.1 ipip0
vppctl ip route add 10.1.1.0/24 via 130.1.1.1 ipip0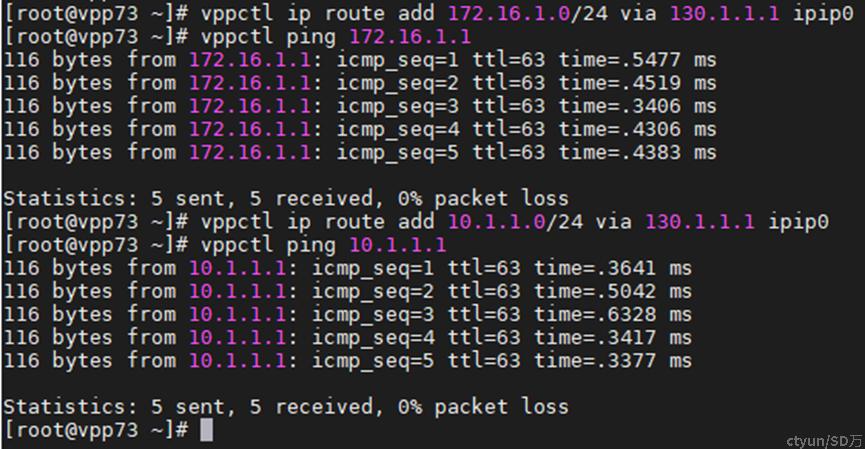
ISP
#
interface GigabitEthernet2/0
ip address 11.1.1.1 255.255.255.0
#
interface GigabitEthernet3/0
ip address 12.1.1.1 255.255.255.0
 nat outbound
#
interface GigabitEthernet4/0
ip address 13.1.1.1 255.255.255.0
验证配置
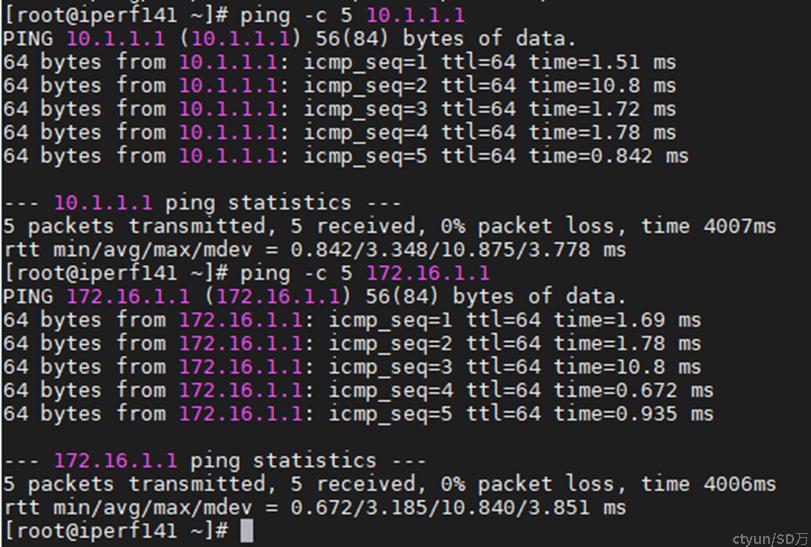
其实到这里,一步步的结果我们都已经看到了。我们先来看看PCA逐级访问的效果。
可以看到,到172.16.1.2就不通了,这个地址是VPP72中VPP的接口地址,是和172.16.1.2配套出现的,考虑是系统内核转发的问题,我们打开主机的转发功能。
echo 1 > /proc/sys/net/ipv4/ip_forward再次测试。
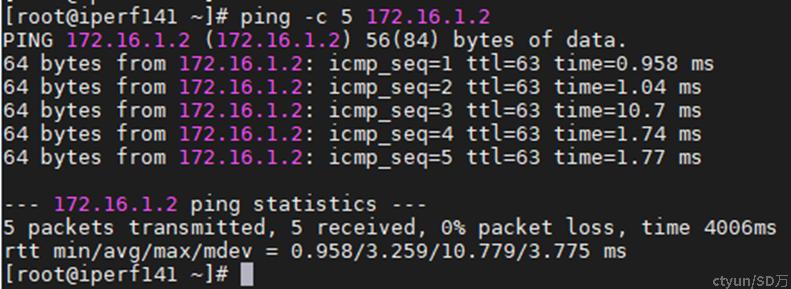
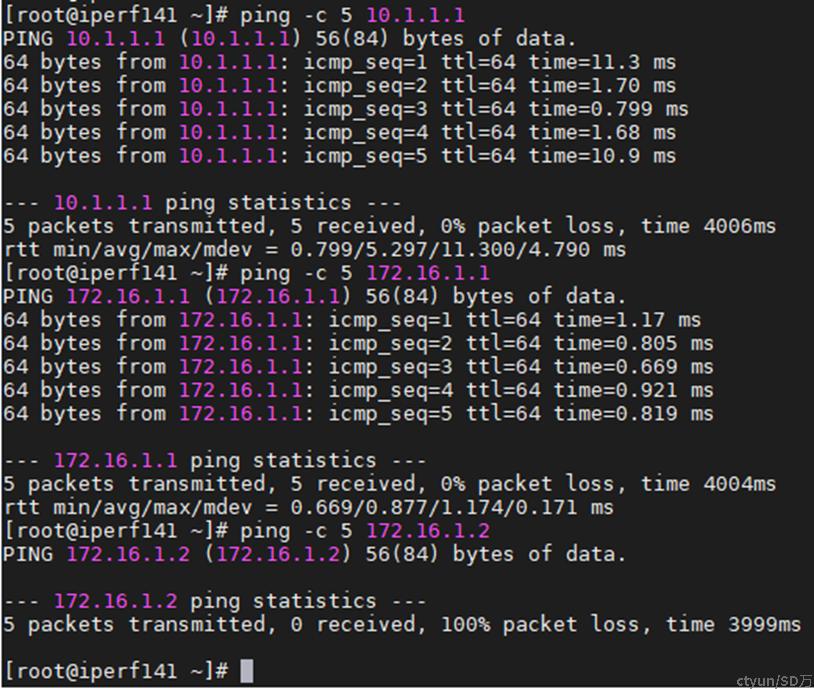
访问成功,我们接着往后走。
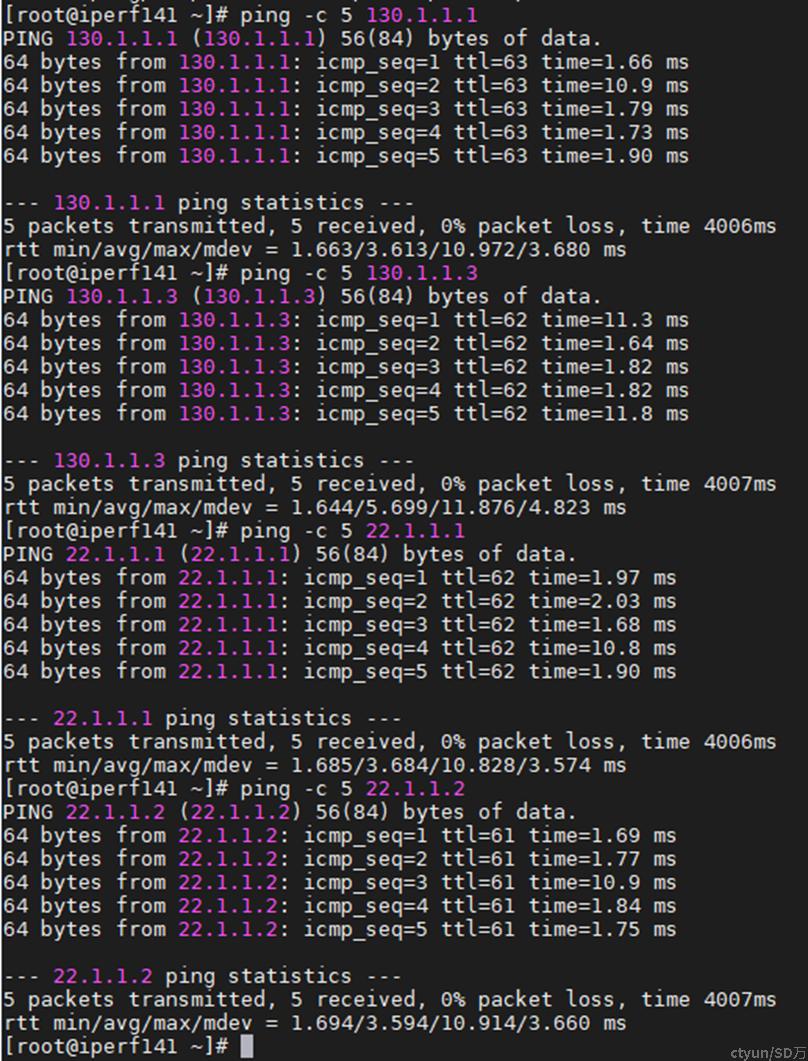
可以看到,已经可以从PCA成功访问到PCB了,并且我们可以看出转发路径是PCA通过Wireguard隧道直接到VPP72,再通过VPP72的veth接口转发到VPP中,再经过IPsec隧道转发到VPP73,最终到达PCB,一共4跳,最终的TTL值为61,完全正常。
最后我们来简单测试一下WireVPP的转发性能。
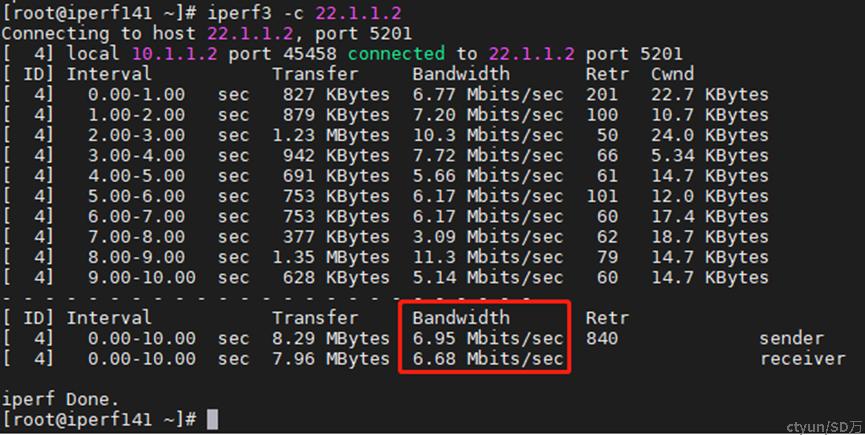
咱也不知道咋整的,PCA到PCB的性能只有可怜的7 Mbps不到。再反过来测试一下从PCB到PCA的转发性能。
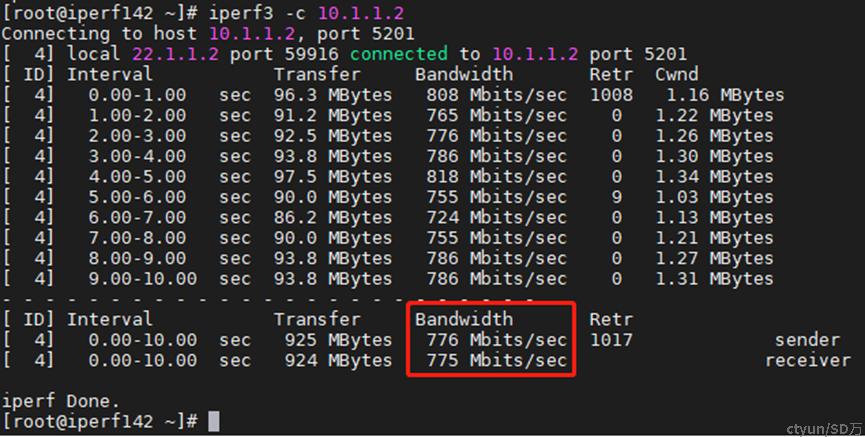
反向测试竟然能达到775 Mbps,相对比较正常,但是和反方向却差了有100多倍,到底是啥原因呢?
