


安装 Ubuntu 系统
- 使用最新官方镜像(Ubuntu 24.04.2 LTS)创建虚拟机或物理机环境
下载地址:https://cn.ubuntu.com/download/desktop - 在vmware中安装虚拟机参考:安装Ubuntu虚拟机
- 安装docker:ubuntu安装docker
- 安装go环境:ubuntu安装go
使用kind搭建k8s本地测试集群
Kind是一个使用Docker容器“节点”运行本地Kubernetes集群的工具。它允许用户快速创建、删除Kubernetes集群,非常适合本地开发和测试。Kind的名称是Kubernetes in Docker的缩写,意味着它将Kubernetes的所有组件部署在一个或多个Docker容器中,以此来模拟一个完整的Kubernetes集群。通过Kind,用户可以轻松地搭建单节点或多节点的Kubernetes集群,这对于开发和测试Kubernetes相关的应用非常有帮助。
kind主要用于在本地机器上快速启动一个Kubernetes集群,由K8s官方开发设计,用于日常开发和测试(勿用于生产环境)。
安装 kubectl
- 通过官方脚本或包管理器安装
sudo apt-get update && sudo apt-get install -y apt-transport-https curl
curl -s https://mirrors.aliyun.com/kubernetes/apt/doc/apt-key.gpg | sudo apt-key add -
echo "deb https://mirrors.aliyun.com/kubernetes/apt/ kubernetes-xenial main" | sudo tee /etc/apt/sources.list.d/kubernetes.list
sudo apt-get update
sudo apt-get install -y kubectl
- 验证
kubectl version --client
# Client Version: v1.28.2
# Kustomize Version: v5.0.4-0.20230601165947-6ce0bf390ce3
安装 kind(Kubernetes in Docker)
- 下载
kind-linux-amd64二进制文件并配置可执行权限
下载地址:https://github.com/kubernetes-sigs/kind/releases
 chmod +x kind-linux-amd64
 sudo mv kind-linux-amd64 kind
 sudo mv ./kind /usr/local/bin/
- 验证
kind version
# kind v0.27.0 go1.23.6 linux/amd64
启动 kind集群并加载镜像
-
下载镜像:docker pull kindest/node:v1.27.3
-
创建 KIND 集群配置文件 kind.yaml(简单测试精简配置就行)
精简配置:vi kind-config.yaml kind: Cluster apiVersion: kind.x-k8s.io/v1alpha4 nodes: - role: control-plane - role: worker - role: worker详细配置:
kind: Cluster apiVersion: kind.x-k8s.io/v1alpha4 nodes: - role: control-plane image: kindest/node:v1.27.3 labels: env: master - role: worker image: kindest/node:v1.27.3 labels: env: dev extraMounts: - hostPath: /opt/k8s/storage/worker1 containerPath: /opt/worker extraPortMappings: - hostPort: 10081 containerPort: 30081 - hostPort: 10082 containerPort: 30082 - role: worker image: kindest/node:v1.27.3 labels: env: test extraMounts: - hostPath: /opt/k8s/storage/worker2 containerPath: /opt/worker extraPortMappings: - hostPort: 20081 containerPort: 30081 - hostPort: 20082 containerPort: 30082 networking: podSubnet: "10.244.0.0/16" serviceSubnet: "10.96.0.0/12" apiServerPort: 6443 -
创建hostPath
mkdir -p /opt/k8s/storage/worker1
mkdir -p /opt/k8s/storage/worker2
- 启动集群
kind create cluster --name k8s-local-dev --config kind.yaml --image=kindest/node:v1.27.3
- 验证集群
kubectl cluster-info
# Kubernetes control plane is running at https://127.0.0.1:41511
# CoreDNS is running at https://127.0.0.1:41511/api/v1/namespaces/kube-system/services/kube-dns:dns/proxy

kind get clusters
# k8s-local-dev
- 集群其他指令
# 删除集群
kind create delete --name k8s-local-dev
# 查看所有集群
kind get nodes -A
# 查看当前集群
kind get clusters
# 查看节点
kind get nodes -n k8s-local-dev
k8s-local-dev-worker
k8s-local-dev-worker2
k8s-local-dev-control-plane
# 指定节点打上标签
kubectl label node k8s-local-dev-control-plane env=master
kubectl label node k8s-local-dev-worker env=dev
kubectl label node k8s-local-dev-worker2 env=test
# kind集群所有节点加载镜像
# 示例 kind load docker-image --name k8s-local-dev busybox:latest
kind load docker-image --name <cluster-name> <image1>
集群测试
- 创建基础的test.yaml文件
# ConfigMap for Nginx listening on port 8080 apiVersion: v1 kind: ConfigMap metadata: name: nginx-config-8080 data: default.conf: | server { listen 8080; location / { return 200 "Hello from Nginx on port 8080!"; } } --- # ConfigMap for Nginx listening on port 8181 apiVersion: v1 kind: ConfigMap metadata: name: nginx-config-8181 data: default.conf: | server { listen 8181; location / { return 200 "Hello from Nginx on port 8181!"; } } --- # Deployment definition apiVersion: apps/v1 kind: Deployment metadata: name: dual-nginx-deployment spec: replicas: 1 selector: matchLabels: app: dual-nginx template: metadata: labels: app: dual-nginx spec: containers: - name: nginx-8080 image: nginx:1.22.1 ports: - containerPort: 8080 name: http-8080 volumeMounts: - name: nginx-conf-8080 mountPath: /etc/nginx/conf.d/default.conf subPath: default.conf - name: nginx-8181 image: nginx:1.22.1 ports: - containerPort: 8181 name: http-8181 volumeMounts: - name: nginx-conf-8181 mountPath: /etc/nginx/conf.d/default.conf subPath: default.conf volumes: - name: nginx-conf-8080 configMap: name: nginx-config-8080 - name: nginx-conf-8181 configMap: name: nginx-config-8181 --- apiVersion: apps/v1 kind: DaemonSet metadata: name: dual-nginx-daemonset spec: updateStrategy: type: RollingUpdate rollingUpdate: maxUnavailable: 1 selector: matchLabels: app: dual-nginx template: metadata: labels: app: dual-nginx spec: containers: - name: nginx-8080 image: nginx:1.22.1 ports: - containerPort: 8080 name: http-8080 volumeMounts: - name: nginx-conf-8080 mountPath: /etc/nginx/conf.d/default.conf subPath: default.conf - name: nginx-8181 image: nginx:1.22.1 ports: - containerPort: 8181 name: http-8181 volumeMounts: - name: nginx-conf-8181 mountPath: /etc/nginx/conf.d/default.conf subPath: default.conf volumes: - name: nginx-conf-8080 configMap: name: nginx-config-8080 - name: nginx-conf-8181 configMap: name: nginx-config-8181 --- # Service definition to expose the two Nginx instances apiVersion: v1 kind: Service metadata: name: dual-nginx-service spec: type: NodePort selector: app: dual-nginx ports: - protocol: TCP port: 8080 targetPort: 8080 nodePort: 30080 name: http-8080 # 添加了端口名称 - protocol: TCP port: 8181 targetPort: 8181 nodePort: 30181 name: http-8181 # 添加了端口名称 - 应用部署
kubectl apply -f test.yaml
# configmap/nginx-config-8080 created
# configmap/nginx-config-8181 created
# deployment.apps/dual-nginx-deployment created
# daemonset.apps/dual-nginx-daemonset created
# service/dual-nginx-service created

# 查看pods
kubectl get pods -A
# 查看configmap
kubectl get configmap
# 查看deployment
kubectl get deployment
# 查看daemonset
kubectl get daemonset
# 查看service
kubectl get service
# 更多指令参见
https://blog.csdn.net/qq_65998623/article/details/146771114
https://blog.csdn.net/hellozhxy/article/details/106077610
开发 Operator 项目
安装 KubeBuilder
- 下载
kubebuilder_linux_amd64并设置环境变量
下载地址: https://github.com/kubernetes-sigs/kubebuilder/releases
chmod +x kubebuilder_linux_amd64
sudo mv kubebuilder_linux_amd64 kubebuilder
sudo mv ./kubebuilder /usr/local/bin/
- 验证
kubebuilder version
# Version: cmd.version{KubeBuilderVersion:"4.5.2", KubernetesVendor:"1.32.1", GitCommit:"7c707052daa2e8bd51f47548c02710b1f1f7a77e", BuildDate:"2025-03-26T19:43:05Z", GoOs:"linux", GoArch:"amd64"}
创建一个hello-world-operator示例
创建项目目录
mkdir hello-world-operator
cd hello-world-operator
初始化项目,生成go.mod
go mod init hello-world-operator
kubebuilder初始化项目
kubebuilder是一个类似于spring 的框架,它提供了一套代码生成和项目框架,帮助开发者快速创建、构建和打包 Kubernetes API,可以快速生成一系列基本的模板文件。
利用kubebuilder 生成脚手架文件
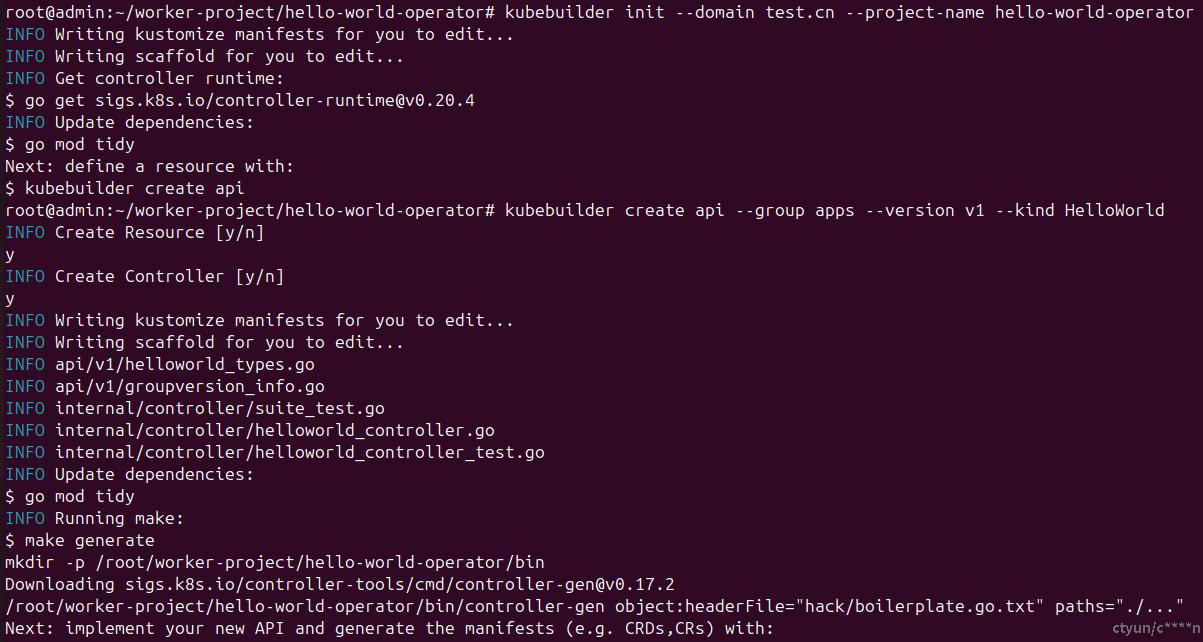
kubebuilder init --domain test.cn --project-name hello-world-operator
# 这会创建一个新的 Kubebuilder 项目,并生成一些必要的文件和目录。
创建自定义资源(Custom Resource Definition, CRD)
kubebuilder create api --group apps --version v1 --kind HelloWorld
# * 提示创建Resource输入y
# * 提示创建Controller输入y
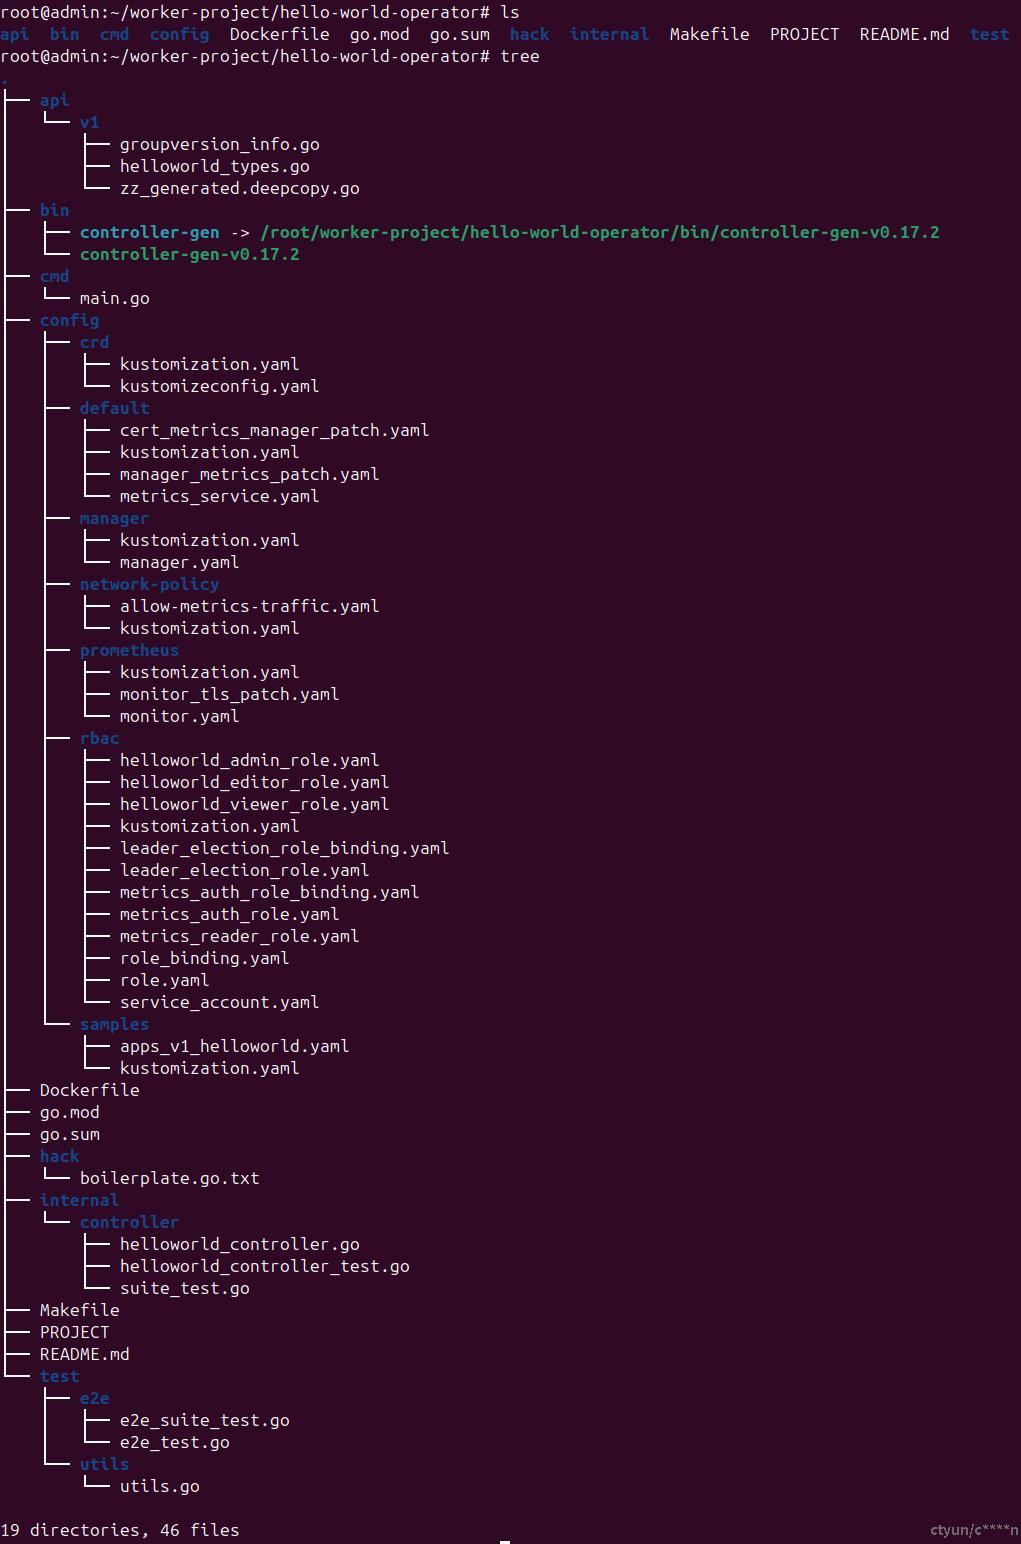
这个命令会创建一个新的 API 定义,包括 api/v1/helloworld_types.go 和 internal/controller/helloworld_controller.go 两个文件。
输出示例
初始化项目注意事项
- 合法的 Kind 名称,遵循以下规范:kubebuilder create api --group apps --version v1 --kind HelloWorld 中的HelloWorld
驼峰命名法(CamelCase)
首字母大写
不含特殊字符(如 -, _) - Kubebuilder 要求项目的 项目名称(project name) 必须符合 DNS-1123 标签规范,即:kubebuilder init --domain test.cn --project-name hello-world-operator 中的 hello-world-operator
只能包含小写字母、数字和 -(连字符)
不能包含下划线 _
必须以字母或数字开头和结尾
修改自定义资源对应的Spec属性
编辑 api/v1/helloworld_types.go 文件,修改 HelloWorldSpec 的定义,添加 name 和 message 字段
// HelloWorldSpec defines the desired state of HelloWorld.
type HelloWorldSpec struct {
	// INSERT ADDITIONAL SPEC FIELDS - desired state of cluster
	// Important: Run "make" to regenerate code after modifying this file

	// Foo is an example field of HelloWorld. Edit helloworld_types.go to remove/update
	Foo string `json:"foo,omitempty"`
	// Name is the name of the HelloWorld resource
    Name string `json:"name,omitempty"`
    // Message is the message to be printed by the pod
    Message string `json:"message,omitempty"`
}
实现 Reconcile 逻辑
编辑internal/controller/helloworld_controller.go 文件,实现 Reconcile 函数, 创建一个 Pod,该 Pod 运行一个 busybox 镜像,并输出 HelloWorld 资源中定义的 message。
/*
Copyright 2025.

Licensed under the Apache License, Version 2.0 (the "License");
you may not use this file except in compliance with the License.
You may obtain a copy of the License at

    http://www.apache.org/licenses/LICENSE-2.0

Unless required by applicable law or agreed to in writing, software
distributed under the License is distributed on an "AS IS" BASIS,
WITHOUT WARRANTIES OR CONDITIONS OF ANY KIND, either express or implied.
See the License for the specific language governing permissions and
limitations under the License.
*/

package controller

import (
	"context"
	"fmt"

	corev1 "k8s.io/api/core/v1"
	apierrors "k8s.io/apimachinery/pkg/api/errors"
	metav1 "k8s.io/apimachinery/pkg/apis/meta/v1"
	"k8s.io/apimachinery/pkg/runtime"
	ctrl "sigs.k8s.io/controller-runtime"
	"sigs.k8s.io/controller-runtime/pkg/client"
	"sigs.k8s.io/controller-runtime/pkg/log"

	appsv1 "hello-world-operator/api/v1"
)

// HelloWorldReconciler reconciles a HelloWorld object
type HelloWorldReconciler struct {
	client.Client
	Scheme *runtime.Scheme
}

// +kubebuilder:rbac:groups=apps.test.cn,resources=helloworlds,verbs=get;list;watch;create;update;patch;delete
// +kubebuilder:rbac:groups=apps.test.cn,resources=helloworlds/status,verbs=get;update;patch
// +kubebuilder:rbac:groups=apps.test.cn,resources=helloworlds/finalizers,verbs=update

// Reconcile is part of the main kubernetes reconciliation loop which aims to
// move the current state of the cluster closer to the desired state.
// TODO(user): Modify the Reconcile function to compare the state specified by
// the HelloWorld object against the actual cluster state, and then
// perform operations to make the cluster state reflect the state specified by
// the user.
//
// For more details, check Reconcile and its Result here:
// - https://pkg.go.dev/sigs.k8s.io/controller-runtime@v0.20.4/pkg/reconcile
func (r *HelloWorldReconciler) Reconcile(ctx context.Context, req ctrl.Request) (ctrl.Result, error) {
	log := log.FromContext(ctx)

	// 1. Fetch the HelloWorld instance
	helloWorld := &appsv1.HelloWorld{}
	err := r.Get(ctx, req.NamespacedName, helloWorld)
	if err != nil {
		if apierrors.IsNotFound(err) {
			// Object not found, return.  Created objects are automatically garbage collected.
			// For additional cleanup logic use finalizers.
			log.Info("HelloWorld resource not found. Ignoring since object must be deleted")
			return ctrl.Result{}, nil
		}
		// Error reading the object - requeue the request.
		log.Error(err, "Failed to get HelloWorld")
		return ctrl.Result{}, err
	}

	// 2. Define the desired Pod
	pod := &corev1.Pod{
		ObjectMeta: metav1.ObjectMeta{
			Name:      helloWorld.Name + "-pod",
			Namespace: helloWorld.Namespace,
			Labels: map[string]string{
				"app": helloWorld.Name,
			},
		},
		Spec: corev1.PodSpec{
			Containers: []corev1.Container{
				{
					Name:            "hello-world",
					Image:           "busybox:latest",
					ImagePullPolicy: corev1.PullIfNotPresent,
					Command:         []string{"sh", "-c", fmt.Sprintf("echo '%s' && sleep 3600", helloWorld.Spec.Message)},
				},
			},
		},
	}

	// 3. Set HelloWorld instance as the owner and controller
	if err := ctrl.SetControllerReference(helloWorld, pod, r.Scheme); err != nil {
		log.Error(err, "Failed to set controller reference")
		return ctrl.Result{}, err
	}

	// 4. Check if the Pod already exists
	found := &corev1.Pod{}
	err = r.Get(ctx, client.ObjectKey{Name: pod.Name, Namespace: pod.Namespace}, found)
	if err != nil && apierrors.IsNotFound(err) {
		log.Info("Creating a new Pod", "Pod.Namespace", pod.Namespace, "Pod.Name", pod.Name)
		err = r.Create(ctx, pod)
		if err != nil {
			log.Error(err, "Failed to create new Pod", "Pod.Namespace", pod.Namespace, "Pod.Name", pod.Name)
			return ctrl.Result{}, err
		}
		// Pod created successfully - return and requeue
		return ctrl.Result{Requeue: true}, nil
	} else if err != nil {
		log.Error(err, "Failed to get Pod")
		return ctrl.Result{}, err
	}

	// 5. Pod already exists - don't requeue
	log.Info("Skip reconcile: Pod already exists", "Pod.Namespace", found.Namespace, "Pod.Name", found.Name)
	return ctrl.Result{}, nil
}

// SetupWithManager sets up the controller with the Manager.
func (r *HelloWorldReconciler) SetupWithManager(mgr ctrl.Manager) error {
	return ctrl.NewControllerManagedBy(mgr).
		For(&appsv1.HelloWorld{}).
		Named("helloworld").
		Complete(r)
}
- 创建 Deployment 的 YAML 示例
apiVersion: apps/v1
kind: Deployment
metadata:
  name: nginx-test
spec:
  replicas: 1
  selector:
    matchLabels:
      app: nginx
  template:
    metadata:
      labels:
        app: nginx
    spec:
      containers:
      - name: nginx
        image: nginx:latest
        ports:
        - containerPort: 80
安装 CRD 到 Kubernetes 集群
# 在 mkdir hello-world-operator 的文件夹中
cd hello-world-operator
make insall
在本地运行 Operator
make run
创建 HelloWorld 资源
cd config/samples
vi apps_v1_helloworld.yaml

# 添加最后两行 name 和 message 即可
apiVersion: apps.test.cn/v1
kind: HelloWorld
metadata:
  labels:
    app.kubernetes.io/name: hello-world-operator
    app.kubernetes.io/managed-by: kustomize
  name: helloworld-sample
spec:
  # TODO(user): Add fields here
  name: hello-world-123
  message: "Hello World from Operator! 123"
- 拉取镜像: docker pull busybox
- 加载到集群中: kind load docker-image --name k8s-local-dev busybox:latest
- 使用
kubectl apply -f apps_v1_helloworld.yaml创建资源。
验证
# 新开一个终端
kubectl get pod
# NAME                    READY   STATUS    RESTARTS   AGE
# helloworld-sample-pod   1/1     Running   0          6s

kubectl logs helloworld-sample-pod
# Hello World from Operator! 123
注意事项
- 建议在开发operator的时候,自定义资源时,在helloworld_types.go文件中添加注解 +kubebuilder:pruning:PreserveUnknownFields,保证k8s的兼容性,保留yaml文件中未识别的字段。注解用于控制 Kubernetes 自定义资源定义(CRD)中的 结构化模式(Structural Schema) 和 修剪(Pruning) 行为。具体来说,这个注解的作用是决定是否保留自定义资源(CR)中未在 CRD 的 OpenAPI v3 模式中定义的未知字段
// EDIT THIS FILE!  THIS IS SCAFFOLDING FOR YOU TO OWN!
// NOTE: json tags are required.  Any new fields you add must have json tags for the fields to be serialized.
// +kubebuilder:pruning:PreserveUnknownFields

// HelloWorldSpec defines the desired state of HelloWorld.
type HelloWorldSpec struct {
	// INSERT ADDITIONAL SPEC FIELDS - desired state of cluster
	// Important: Run "make" to regenerate code after modifying this file

	// Foo is an example field of HelloWorld. Edit helloworld_types.go to remove/update
	Foo string `json:"foo,omitempty"`
	// Name is the name of the HelloWorld resource
	Name string `json:"name,omitempty"`
	// Message is the message to be printed by the pod
	Message string `json:"message,omitempty"`
}
后续
后续继续补充把operator打包成镜像,并放到集群中。
