


概述
Rally是由OpenStack社区开发的,使用Python编写,用于OpenStack的部署,验证,测试和性能分析的测试工具。
后期社区将Rally定位于一个通用的测试工具(剥离了OpenStack相关的测试代码,另外创建了rally-openstack项目)
注意:我们这里提到的rally,包含rally-openstack项目
- Rally as-a-Service: 作为呈现在Web UI的守护程序运行,以便整个团队可以使用
- Rally as-an-App: 作为一个轻巧且可移植的CLI,使它的使用和开发变得简单
Rally目前只提供了CLI的使用方法
Rally主要提供了4个方面的功能:
- Deploy:这不是一个真的部署工具,它只是一个插件形式的东西,它可以和其他部署工具(比如 DevStack,Fuel,Anvil等)一起工作来简化和统一部署流程
- Verify:包装了基于unittest的功能测试框架,并提供具有结果存储和报告功能的完整工具,目前社区只提供了OpenStack Tempest的插件。
- Benchmark:性能测试框架,通过编写参数化插件并使用YAML来实现复杂的性能测试案例,目前社区通过rally-openstack项目提供了各个组件大量基础性能测试案例
- Report:提供了完整的测试报告,尤其是在性能测试报告中展示了多种统计图表
使用简介
下载与安装
下载源码
git clone https://github.com/openstack/rally.git
安装
根据我们的使用经验,Rally最好采用如下两种打包方式进行安装:
容器镜像
- 社区:docker pull xrally/xrally
- 构建Dockerfile: 可以使用pip安装rally及相关依赖
pip install rally==<rally_version>
python-virtualenv包
当遇到不能使用容器镜像的环境时,可以考虑将rally及相关依赖打包到python-virtualenv包中,在制作与使用时需要注意:
- 构建与使用的环境要尽量一致,防止出现找不到相关链接库的情况
- 构建与使用的目录要一致,否则需要刷新虚拟环境中Python的位置
- 构建时要将用户目录下的.rally目录一同打包,并在解压使用时还原
其他注意事项:
- 生成报告前,需要修改如下内容,否则报告的html格式很有可能无法载入
sed -i "s|https://cdnjs.cloudflare.com/ajax/libs/nvd3/1.1.15-beta/nv.d3.min.css|http://cdn.bootcss.com/nvd3/1.1.15-beta/nv.d3.css|g" \

    /usr/lib/python2.7/site-packages/rally/ui/templates/task/report.html

sed -i "s|https://ajax.googleapis.com/ajax/libs/angularjs/1.3.3/angular.min.js|http://cdn.bootcss.com/angular.js/1.3.3/angular.min.js|g" \

    /usr/lib/python2.7/site-packages/rally/ui/templates/task/report.html

sed -i "s|https://cdnjs.cloudflare.com/ajax/libs/d3/3.4.13/d3.min.js|http://cdn.bootcss.com/d3/3.4.13/d3.min.js|g" \

    /usr/lib/python2.7/site-packages/rally/ui/templates/task/report.html

sed -i "s|https://cdnjs.cloudflare.com/ajax/libs/nvd3/1.1.15-beta/nv.d3.min.js|http://cdn.bootcss.com/nvd3/1.1.15-beta/nv.d3.min.js|g" \

    /usr/lib/python2.7/site-packages/rally/ui/templates/task/report.html

sed -i "s|https://ajax.googleapis.com/ajax/libs/angularjs/1.3.3/angular.min.js|http://cdn.bootcss.com/angular.js/1.3.3/angular.min.js|g" \

    /usr/lib/python2.7/site-packages/rally/ui/templates/verification/report.html
环境构建
在运行rally前,需要提供OpenStack环境的凭证信息,一般可以通过openrc文件或json配置文件来初始化运行环境
- openrc
执行如下命令:
source openrc
rally deployment create --fromenv --name <name>
- json
执行如下命令:
rally deployment create --filename existing_cloud.json --name <name>
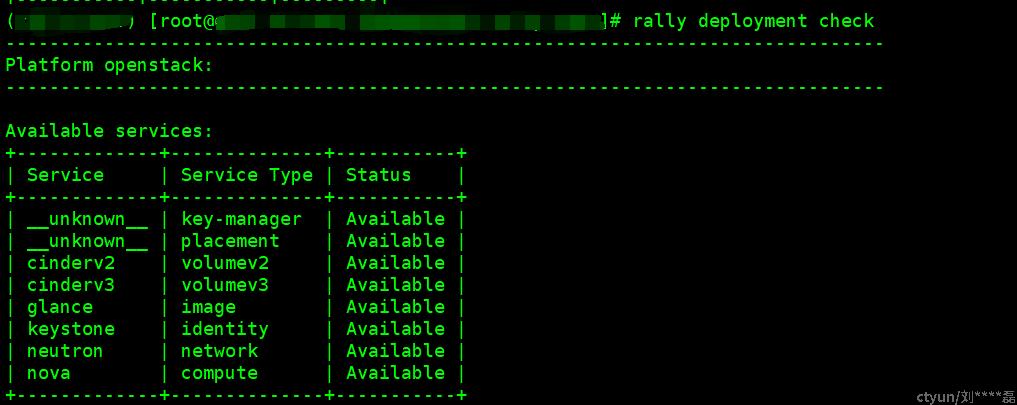
环境初始化完成后,可以使用rally deployment check命令检查
测试运行
配置准备
rally.conf
rally运行的参数,可以通过 rally.conf 文件来进行管理,社区有配置的模板可以参考
https://github.com/openstack/rally/blob/master/etc/rally/rally.conf.sample
- conf文件拷贝到~/.rally/目录下
执行测试时,rally会自动读取这些配置
优先级:rally.conf的位置
sys.prefix + "/etc/rally" > "~/.rally" > "/etc/rally"sys.prefix
A string giving the site-specific directory prefix where the platform independent Python files are installed; by default, this is the string '/usr/local'. This can be set at build time with the --prefix argument to the configure script. The main collection of Python library modules is installed in the directory prefix/lib/pythonX.Y while the platform independent header files (all except pyconfig.h) are stored in prefix/include/pythonX.Y, where X.Y is the version number of Python, for example 2.7.- rally支持通过--config-file 来指定配置文件的位置
下面的命令获取 ~/rally.conf 文件的参数,用于测试的执行
rally --config-file ~/rally.conf task start ...环境变量
rally支持通过环境变量设置参数,参数形式为 OS_OPENSTACK__OPTION, 比如 OS_OPENSTACK__NOVA_SERVER_BOOT_TIMEOUT
测试例准备
测试例查看
rally通过 rally plugin list 查看支持的测试例
测试例
通过文件来定义,格式是yaml或json,一般需要包含:任务参数,上下文context,负载类型runner,sla
比如,测试例 boot_and_delete_server.yaml
{% set image_name = image_name or "CentOS7.6" %}
{% set flavor_name = flavor_name or "m1.tiny" %}
---
  version: 2
  title: Task Nova boot_and_delete_server
  subtasks:
    -
      title: NovaServers.boot_and_delete_server tests
      scenario:
        NovaServers.boot_and_delete_server:
          flavor:
            name: {{flavor_name}}
          image:
            name: {{image_name}}
          auto_assign_nic: true
      runner:
        constant:
          times: 10
          concurrency: 2
      contexts:
        network: {}
        users:
          tenants: 5
          users_per_tenant: 2
      sla:
        failure_rate:
          max: 0
测试执行
rally task start boot_and_delete_server.yaml --tag boot_and_delete_server测试例执行的流程如下

结果查看与报告输出
rally提供html格式的报告,可以直观的展示测试的过程及数据
rally task report <task-uuid> --html --out boot_and_delete_server.html注:task-uuid可以使用 rally task list查看
测试例boot_and_delete_server的报告图例

该表显示了相应场景产生的负载持续时间Load duration,整个子任务执行时间Full duration(包括上下文创建的持续时间),每种场景的迭代次数Iterations,运行方案时使用的负载类型Runner,失败的迭代次数Errors以及方案是否最终通过了特定的成功标准 SLA
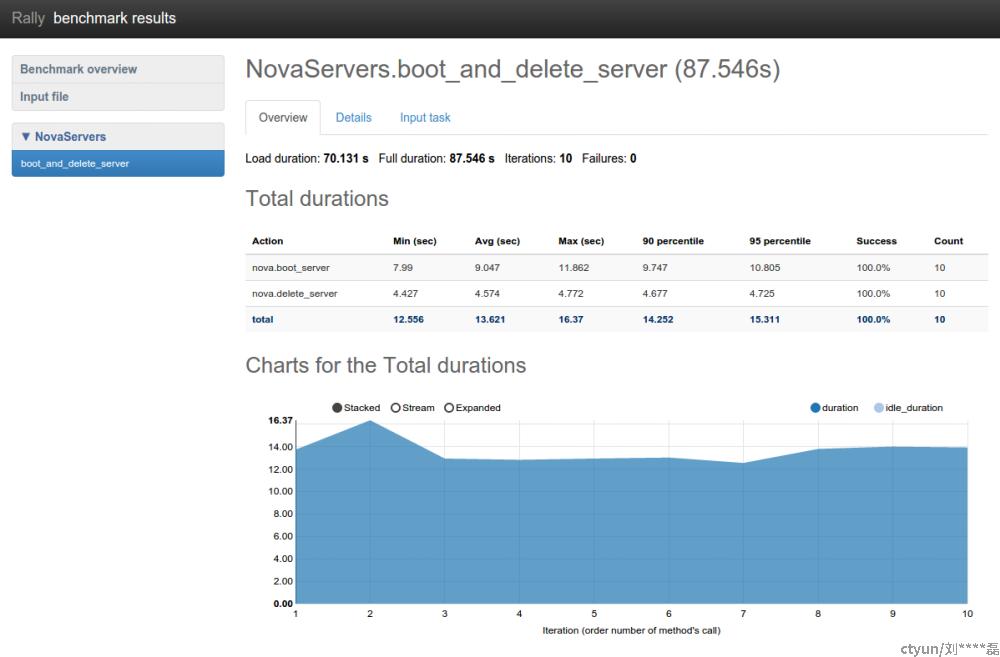
该页面显示了迭代持续时间的更详细的信息和统计。 “Total durations”将场景的持续时间分为几个动作,“ boot_and_delete_server”场景由两个动作组成:“ boot_server”和“ delete_server”,在该表中还可以查看场景持续时间在整个迭代过程中的变化。
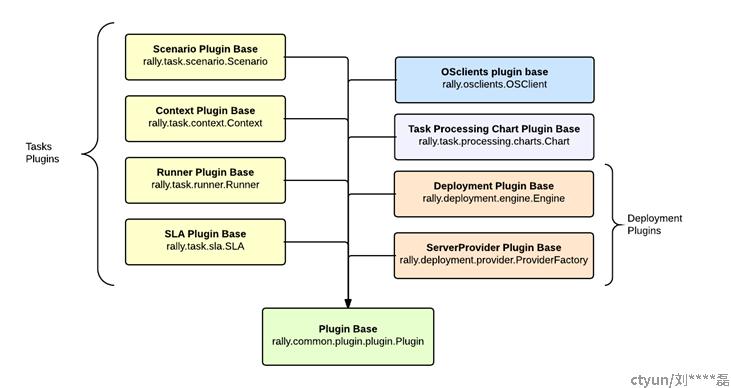
Rally插件
Rally具有面向插件的体系结构,提供了scenario, runner, context,hook,verify等插件
下面介绍一些常用的plugin
Context
context在场景(scenario)迭代开始之前和结束后执行。 例如,在上下文里可以创建由测试例场景(scenario)使用的资源(例如,VPC,flavor,安全组等), 同时将所有创建的对象放入self.context 中,通过它们在场景中可用。
例如创建一个flavor的上下文插件,该插件在测试场景开始第一次迭代之前创建flavor,在测试场景完成所有迭代的执行之后将其删除。
from rally.common import logging
from rally.common import utils as rutils
from rally.common import validation
from rally.task import context

from rally_openstack.cleanup import manager as resource_manager
from rally_openstack import consts
from rally_openstack import osclients


LOG = logging.getLogger(__name__)


@validation.add("required_platform", platform="openstack", admin=True)
@context.configure(name="flavors", platform="openstack", order=340)
class FlavorsGenerator(context.Context):
    """Context creates a list of flavors."""

    CONFIG_SCHEMA = {
        "type": "array",
        "$schema": consts.JSON_SCHEMA,
        "items": {
            "type": "object",
            "properties": {
                "name": {
                    "type": "string",
                },
                "ram": {
                    "type": "integer",
                    "minimum": 1
                },
                "vcpus": {
                    "type": "integer",
                    "minimum": 1
                },
                "disk": {
                    "type": "integer",
                    "minimum": 0
                },
                "swap": {
                    "type": "integer",
                    "minimum": 0
                },
                "ephemeral": {
                    "type": "integer",
                    "minimum": 0
                },
                "extra_specs": {
                    "type": "object",
                    "additionalProperties": {
                        "type": "string"
                    }
                }
            },
            "additionalProperties": False,
            "required": ["name", "ram"]
        }
    }

    def setup(self):
        """Create list of flavors."""
        from novaclient import exceptions as nova_exceptions

        self.context["flavors"] = {}

        clients = osclients.Clients(self.context["admin"]["credential"])
        for flavor_config in self.config:
            extra_specs = flavor_config.get("extra_specs")
            flavor_config = FlavorConfig(**flavor_config)
            try:
                flavor = clients.nova().flavors.create(**flavor_config)
            except nova_exceptions.Conflict:
                msg = "Using existing flavor %s" % flavor_config["name"]
                if logging.is_debug():
                    LOG.exception(msg)
                else:
                    LOG.warning(msg)
                continue

            if extra_specs:
                flavor.set_keys(extra_specs)

            self.context["flavors"][flavor_config["name"]] = flavor.to_dict()
            LOG.debug("Created flavor with id '%s'" % flavor.id)

    def cleanup(self):
        """Delete created flavors."""
        mather = rutils.make_name_matcher(*[f["name"] for f in self.config])
        resource_manager.cleanup(
            names=["nova.flavors"],
            admin=self.context["admin"],
            api_versions=self.context["config"].get("api_versions"),
            superclass=mather,
            task_id=self.get_owner_id())


class FlavorConfig(dict):
    def __init__(self, name, ram, vcpus=1, disk=0, swap=0, ephemeral=0,
                 extra_specs=None):
        """Flavor configuration for context and flavor & image validation code.

        Context code uses this code to provide default values for flavor
        creation.  Validation code uses this class as a Flavor instance to
        check image validity against a flavor that is to be created by
        the context.

        :param name: name of the newly created flavor
        :param ram: RAM amount for the flavor (MBs)
        :param vcpus: VCPUs amount for the flavor
        :param disk: disk amount for the flavor (GBs)
        :param swap: swap amount for the flavor (MBs)
        :param ephemeral: ephemeral disk amount for the flavor (GBs)
        :param extra_specs: is ignored
        """
        super(FlavorConfig, self).__init__(
            name=name, ram=ram, vcpus=vcpus, disk=disk,
            swap=swap, ephemeral=ephemeral)
        self.__dict__.update(self)
通过在上下文部分中指定flavor插件,可以使用它。 如下所示:
{% set image_name = image_name or "CentOS7.6" %}
---
  version: 2
  title: Task Nova boot_and_delete_server
  subtasks:
    -
      title: NovaServers.boot_and_delete_server tests
      scenario:
        NovaServers.boot_and_delete_server:
          image:
            name: {{image_name}}
          auto_assign_nic: true
      runner:
        constant:
          times: 10
          concurrency: 2
      contexts:
        network: {}
        flavors:
          ram: 1024
          name: "rally-flavor"
        users:
          tenants: 5
          users_per_tenant: 2
      sla:
        failure_rate:
          max: 0
Scenario
测试场景就是一个测试例,这是我们编写脚本时实现的主体
测试场景继承OpenStackScenario类,并在其中实现测试过程。 为了便于讲解,我们将一些结构简化,首先以普通用户的身份list flavor,然后使用管理员重复进行以下操作:
from rally import consts
from rally.task import atomic
from rally.task import validation

from rally_openstack import scenario

@validation.add("required_services", services=[consts.Service.NOVA])
@validation.add("required_platform", platform="openstack", users=True)
@scenario.configure(name="ScenarioPlugin.list_flavors_useless")
class ListFlavors(scenario.OpenStackScenario):
    """Sample plugin which lists flavors."""

    @atomic.action_timer("list_flavors")
    def _list_flavors(self):
        """Sample of usage clients - list flavors

        You can use self.context, self.admin_clients and self.clients
        which are initialized on scenario instance creation"""
        self.clients("nova").flavors.list()

    @atomic.action_timer("list_flavors_as_admin")
    def _list_flavors_as_admin(self):
        """The same with admin clients"""
        self.admin_clients("nova").flavors.list()

    def run(self):
        """List flavors."""
        self._list_flavors()
        self._list_flavors_as_admin()
Runner
目前的负载类型:
- constant:持续不变的并发,concurrency表示并发数,times表示迭代总数
- rps:吞吐量,rps表示每秒的请求数,times表示持续的时间(单位秒)
- constant_for_duration:规定时间内保持固定的并发数,concurrency表示并发数,duration:持续时间(单位秒)
- serial:串行执行,times:迭代次数
constant方式,是利用mutiprocessing的Pool方式创建一个进程池,池中的进程数量等于runner的配置参数中的concurrency,执行每个task时,由池中所有的进程同时测试、模拟多用户并发的情况。constant方式中要求提供参数times,用于指定一个task中执行测试用例的次数。
@validation.add("check_constant")
@runner.configure(name="constant")
class ConstantScenarioRunner(runner.ScenarioRunner):
    """Creates constant load executing a scenario a specified number of times.

    This runner will place a constant load on the cloud under test by
    executing each scenario iteration without pausing between iterations
    up to the number of times specified in the scenario config.

    The concurrency parameter of the scenario config controls the
    number of concurrent iterations which execute during a single
    scenario in order to simulate the activities of multiple users
    placing load on the cloud under test.
    """

    CONFIG_SCHEMA = {
        "type": "object",
        "$schema": consts.JSON_SCHEMA,
        "properties": {
            "concurrency": {
                "type": "integer",
                "minimum": 1,
                "description": "The number of parallel iteration executions."
            },
            "times": {
                "type": "integer",
                "minimum": 1,
                "description": "Total number of iteration executions."
            },
            "timeout": {
                "type": "number",
                "description": "Operation's timeout."
            },
            "max_cpu_count": {
                "type": "integer",
                "minimum": 1,
                "description": "The maximum number of processes to create load"
                               " from."
            }
        },
        "additionalProperties": False
    }

    def _run_scenario(self, cls, method_name, context, args):
        """Runs the specified scenario with given arguments.

        This method generates a constant load on the cloud under test by
        executing each scenario iteration using a pool of processes without
        pausing between iterations up to the number of times specified
        in the scenario config.

        :param cls: The Scenario class where the scenario is implemented
        :param method_name: Name of the method that implements the scenario
        :param context: context that contains users, admin & other
                        information, that was created before scenario
                        execution starts.
        :param args: Arguments to call the scenario method with

        :returns: List of results fore each single scenario iteration,
                  where each result is a dictionary
        """
        timeout = self.config.get("timeout", 0)  # 0 means no timeout
        times = self.config.get("times", 1)
        concurrency = self.config.get("concurrency", 1)
        iteration_gen = utils.RAMInt()

        cpu_count = multiprocessing.cpu_count()
        max_cpu_used = min(cpu_count,
                           self.config.get("max_cpu_count", cpu_count))

        processes_to_start = min(max_cpu_used, times, concurrency)
        concurrency_per_worker, concurrency_overhead = divmod(
            concurrency, processes_to_start)

        self._log_debug_info(times=times, concurrency=concurrency,
                             timeout=timeout, max_cpu_used=max_cpu_used,
                             processes_to_start=processes_to_start,
                             concurrency_per_worker=concurrency_per_worker,
                             concurrency_overhead=concurrency_overhead)

        result_queue = multiprocessing.Queue()
        event_queue = multiprocessing.Queue()

        def worker_args_gen(concurrency_overhead):
            while True:
                yield (result_queue, iteration_gen, timeout,
                       concurrency_per_worker + (concurrency_overhead and 1),
                       times, None, context, cls, method_name, args,
                       event_queue, self.aborted)
                if concurrency_overhead:
                    concurrency_overhead -= 1

        process_pool = self._create_process_pool(
            processes_to_start, _worker_process,
            worker_args_gen(concurrency_overhead))
        self._join_processes(process_pool, result_queue, event_queue)
Verfiy
rally verify插件提供了一种通用的过程,用于将功能测试纳入rally的管理中,OpenStack的官方测试套件Tempest是一个功能强大的工具,可以针对OpenStack集群运行一组功能测试。
rally通过verify插件整合了tempest的安装,配置,运行,报告的过程,并统一提供了命令行用来管理
- 测试套件管理:提供了安装,升级,卸载,配置的功能
- 测试例运行:提供多种运行机制,例如预期失败,要跳过的测试列表,要启动的测试列表,重新运行先前的验证或只是失败的测试等等
- 测试结果输出: Rally数据库存储所有结果数据,可以提供运行摘要,运行参数,错误消息等。验证报告可以多种格式生成:HTML,JSON,JUnit-XML
总结
Rally是一个优秀的自动化测试框架,提供了功能测试,性能测试,可靠性测试等的解决方案,并内置了丰富的报告模板;其通过plugin的方式,提供了强大的扩展能力,能够适配绝大多数的测试场景,并对接其他已有的测试框架。
参考文档
- https://github.com/openstack/rally
- https://hub.docker.com/r/xrally/xrally
- https://docs.openstack.org/rally/latest/
